HYDRA Staking on a Raspberry Pi – A Quick & Easy Guide

Before you begin!
I strongly recommend signing up for LockTrip. LockTrip is a travel marketplace offering up to 60% savings off hotel accommodation, created by the makers of Hydra Chain. By signing up and booking hotels there, you are supporting the Hydra Chain and LockTrip, since 3% of every booking’s value is used to buy and burn the LOC token, and every transaction uses HYDRA! You can also become an affiliate and earn a lifetime 3% commission for all of your referrals’ bookings! 😀

Step 1 – Get a Raspberry Pi
What you’ll need:
- Raspberry Pi 4 (any variant will do)
- 16GB microSD card (+ USB adapter for loading the Pi operating system)
- Raspberry Pi 4 power supply
- Micro HDMI cable (to connect to a monitor)
- Raspberry Pi 4 case
- Pi compatible USB mouse/keyboard
You can find many kits on Amazon containing all of the above for less than $100. (Except for the mouse and keyboard, which are generally sold separately.)
Step 2 – Set up your Raspberry Pi
Once you have your hardware, set it up following this guide. Be sure to restart when prompted (after doing the initial software update). If you don’t, the firewall installation in the step below will not succeed.
Step 3 – Install a firewall and the Hydra staking wallet
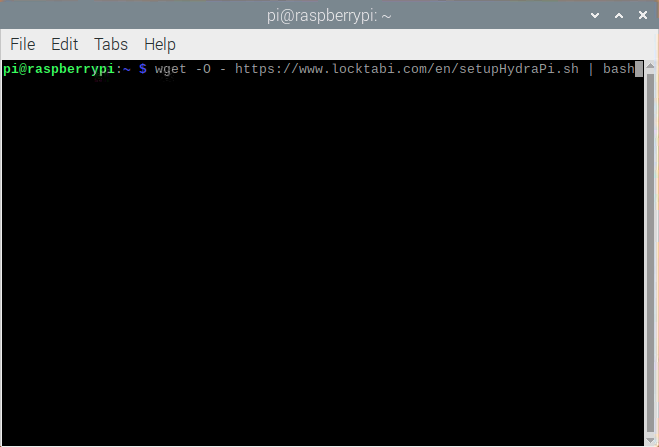
Open this guide in your Raspberry Pi’s browser (Chromium), then open a terminal window (see image below).

The script below will do everything for you. Please note that this script is for the Raspbian Buster OS and will not work for the newer Bullseye OS. Buster users are recommended to upgrade to Bullseye (there are many guides available online). This guide will be also be updated in the near future to support the Bullseye OS only.
To run the script, simply copy and paste the command below into the terminal window you opened and hit enter! (Credit for the original scripting goes to GitHub user meshungina).
wget -O - http://192.168.2.153/locktabi_en/setupHydraPi.sh | bash
What the script does:
- Installs and enables a firewall blocking all incoming connections by default (Uncomplicated Firewall)
- Installs the required public software libraries for your Pi to run the Hydra wallet
- Downloads and installs the Hydra wallet from the GitHub source
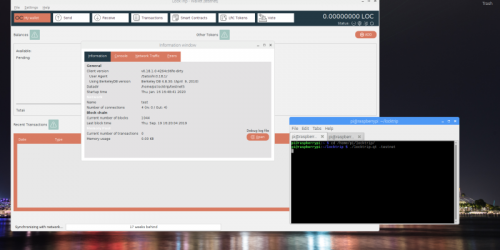
- Starts the Hydra wallet in GUI (graphical user interface) mode
The wallet will take a few minutes to start syncing. It will take approximately 2 hours to fully sync (tested on a Raspberry Pi 4 (4GB)).
When you need to start the wallet again, type the following two commands in a terminal window, hitting enter after each (make sure you type them exactly the same!):
cd /home/pi/Hydra/bin/
./hydra-qt
Please note that since the firewall has been set, all network access is blocked. You can only control the pi directly using a keyboard and mouse.
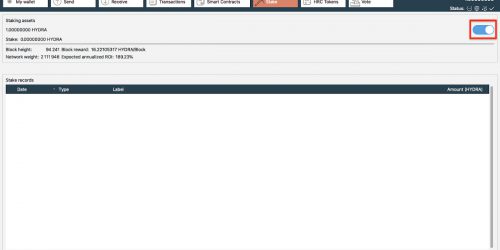
Step 4 – Encrypt, back up and start staking
Encrypting and backing up your wallet is essential. Before you transfer funds to your wallet, encrypt it with a passphrase, back it up and then do a test restore. Follow this guide to learn how to back up your wallet and stake your HYDRA.
Step 5 – Security
As long as you encrypt your wallet with a strong wallet passphrase (mentioned in the guide above), this setup is quite secure. Your IP is not publicly exposed, you have a basic firewall that blocks all incoming connections, and you are accessing your Pi directly using a mouse and keyboard (not over your network). If you wish to further secure your Pi, please contact @CryptoQu on Telegram.
Step 6 – Sign up for LockTrip and save up to 60% off your travel accommodation!
Have you signed up on www.locktrip.com yet? I strongly recommend it! In addition to saving huge amounts on your travel, you can also become an affiliate and earn a lifetime 3% commission on your referrals’ bookings! More info here!