
LockTrip Testnet Wallet Setup for the Raspberry Pi (OLD)
PLEASE NOTE THIS GUIDE IS NOW OUTDATED. PLEASE REFER TO THE HYDRA WALLET GUIDES.
This guide will walk you through the steps required to download and set up the LockTrip testnet wallet for the Raspbian operating system (Raspberry Pi). It also includes useful information on how to set up a basic firewall, keep your Pi up-to-date, and how to backup the Pi itself. Please use the comment box at the end of the guide if you have any questions, comments or suggestions. Also, don’t forget to sign-up to the LockTrip Marketplace and start saving on your travel!
The guide assumes you already have Raspbian up and running on your Raspberry Pi, with an internet connection. If you do not, follow the instructions here.
The Raspbian shortcut bar is located at the top left corner of the desktop.
From left: Applications Menu; Chromium Web Browser; File Manager; Terminal window
Step 1
Open Chromium and download the latest ARM version (locktrip-0.18.4-arm-linux-gnueabihf.zip) of the testnet wallet from the LockTrip GitHub.
Create a folder called “locktrip” in the “/home/pi” folder. Once the download has finished, open File Manager and move the file from the “/home/pi/Downloads” folder to the “/home/pi/locktrip” folder. Now right-click the file and click “Extract Here”.

Four folders will appear. Inside the “bin” folder, you will find locktrip-qt, locktripd and locktrip-cli. These files cannot be opened by clicking on them; we need to use Terminal. You can delete the downloaded .zip file, it’s no longer needed.
Step 2
Open a Terminal window and navigate to the “bin” folder by typing the following command and pressing enter.
cd /home/pi/locktrip/bin
Tip: pressing the “tab” key while typing a folder name will autocomplete the folder name.
The LockTrip team has included a graphical user interface (GUI) version of the LockTrip wallet in this zip file. It’s much easier to use than the command line interface. If you would prefer to use the GUI version, enter the following command to start the wallet:
./locktrip-qt -testnet
If you get a permission denied error, enter the following command and try again:
chmod u+x locktrip-qt
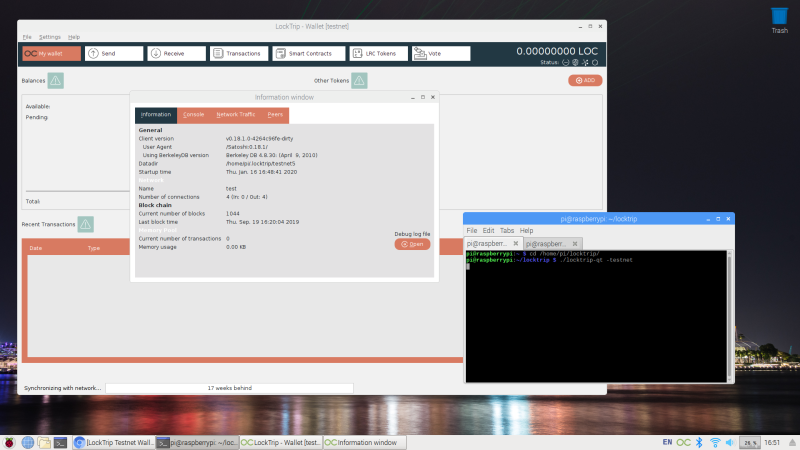
The wallet should start, and ask you where you would like to store the blockchain data. The default directory is fine. If you are using a Pi 3B+, it is advised not to try and do too many things at once while running the GUI wallet. The system may become unstable. The GUI interface is quite self-explanatory. The steps at the bottom of this article regarding securing your system with a firewall, and keeping it up-to-date are also relevant.
If you have waited a long time and still don’t have any network connections, close the wallet and copy this file (right-click, save link as) to your “/home/pi/.locktrip” folder. Note the “.” before locktrip. This is the data directory, not the folder containing locktrip-qt etc. If you can’t see the folder, you probably need to show hidden files: go to the “View” menu in an explorer window and select “Show Hidden”. You will need to restart the software for this to take effect. Close the wallet then re-start it using “./locktrip-qt -testnet”.
It’s also helpful for the testnet if you open your ports to accept incoming connections. This helps the network grow. Click here and follow the guide.
If you have any questions, please post at the bottom of this article, or ask the team in Telegram.
If you would like to use the command line interface to control your wallet, read on!
Command Line Interface
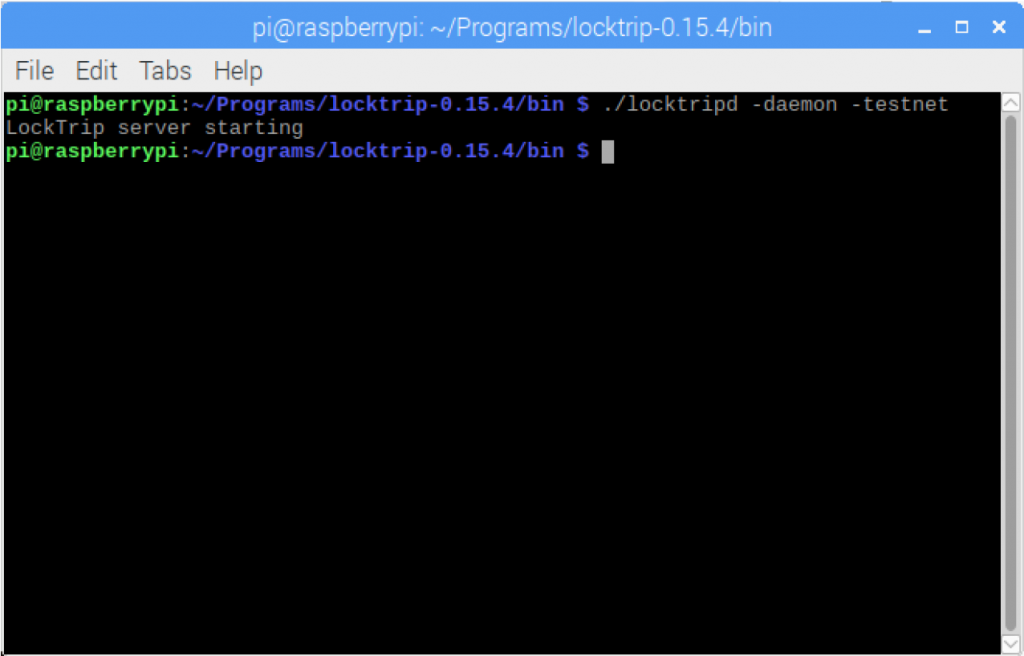
In the “bin” folder, use the following command to start the LockTrip wallet in testnet mode:
./locktripd -daemon -testnet
If you get a permission denied error, enter the command below and try again.
chmod u+x locktripd
Congratulations, the LockTrip testnet wallet is now running! It may look like nothing is happening, but it’s there running in the background.
Please note that the following images show a different working directory (“Programs/locktrip-0.15.4/bin”). Your working directory should be “/home/pi/locktrip/bin” if you followed the directions above. This is the directory where your “locktripd“ file is located.
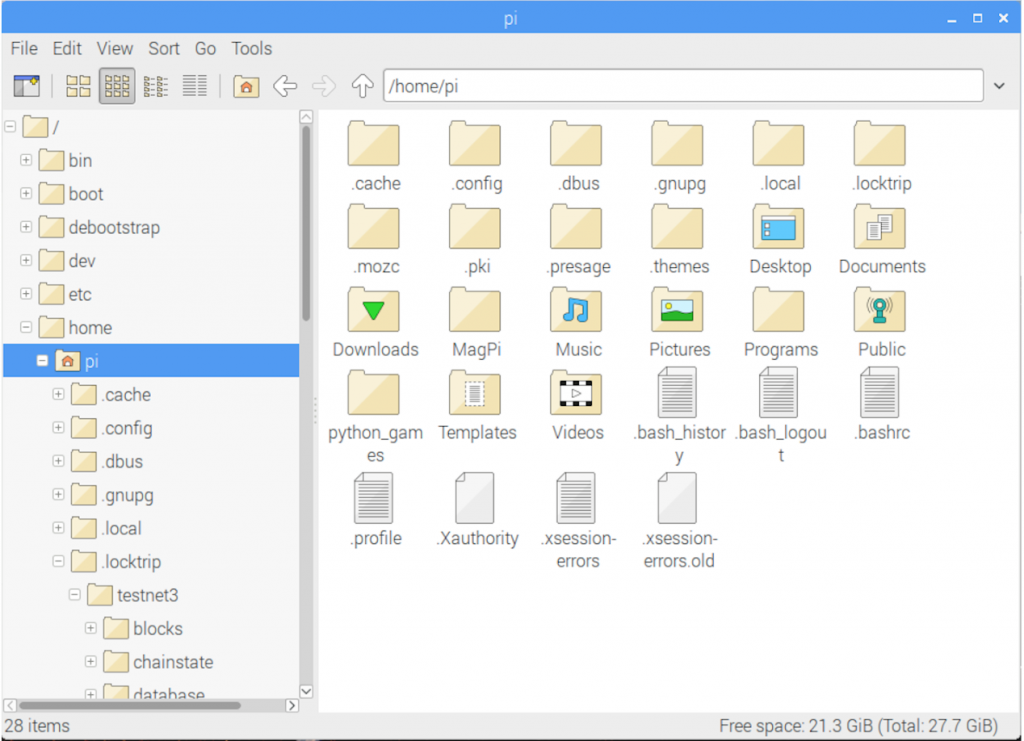
A new folder called “.locktrip” will also have been created in the “/home/pi” directory. If you can’t see it, you will need to show hidden files (in the “View” menu). This is where the blockchain data and your wallet file are stored. You can back up and move your wallet to another system simply by copying the wallet.dat file to a usb disk.
Step 3
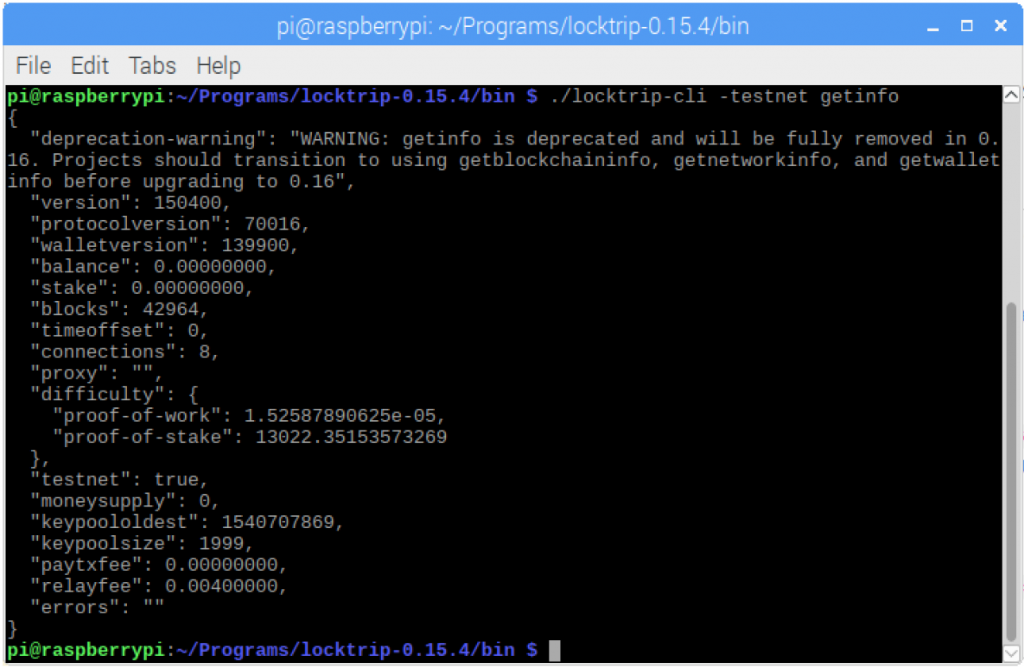
In order to send commands to the wallet, we need to use the locktrip-cli file. Let’s start by retrieving the information about your wallet. Type the following into Terminal and hit enter:
./locktrip-cli -testnet getwalletinfo
If you get a permission denied error, enter the command below and try again.
chmod u+x locktrip-cli
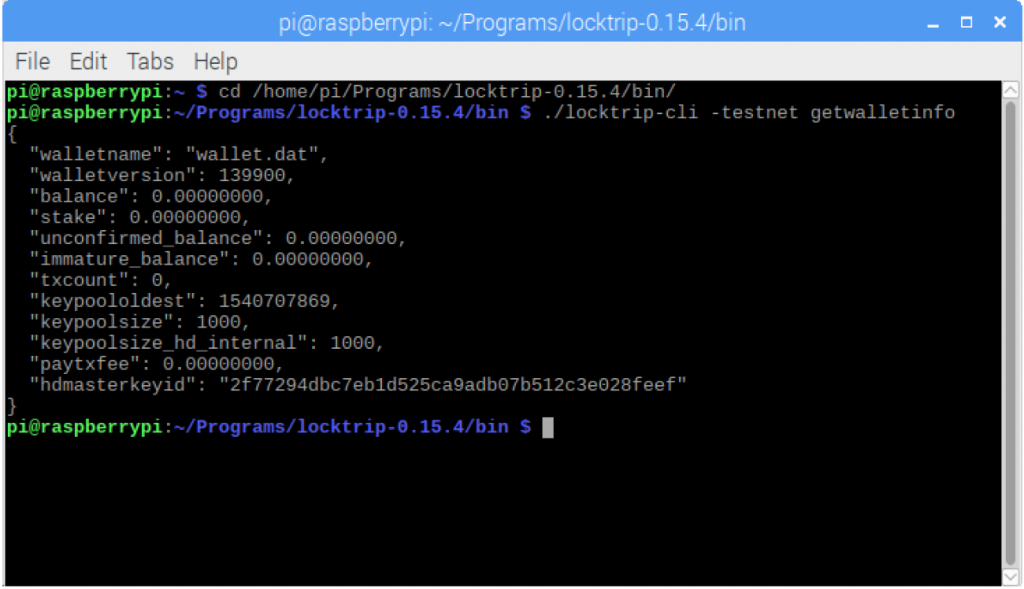
The important parts to note here are “balance” and “stake”. These will update when you have coins in your wallet.
Step 4
Now is a good time to familiarise yourself with encrypting your wallet. This adds an extra layer of security by setting a wallet passphrase, which will be required to unlock your wallet. Thus, even if someone gets a hold of your wallet file, they will not be able to control it. You can skip this step for now, if you want to. But it’s a much better idea to set it up and become comfortable using it now, before transferring funds to your wallet.
To encrypt your wallet, use the following command:
./locktrip-cli -testnet encryptwallet yourpassword
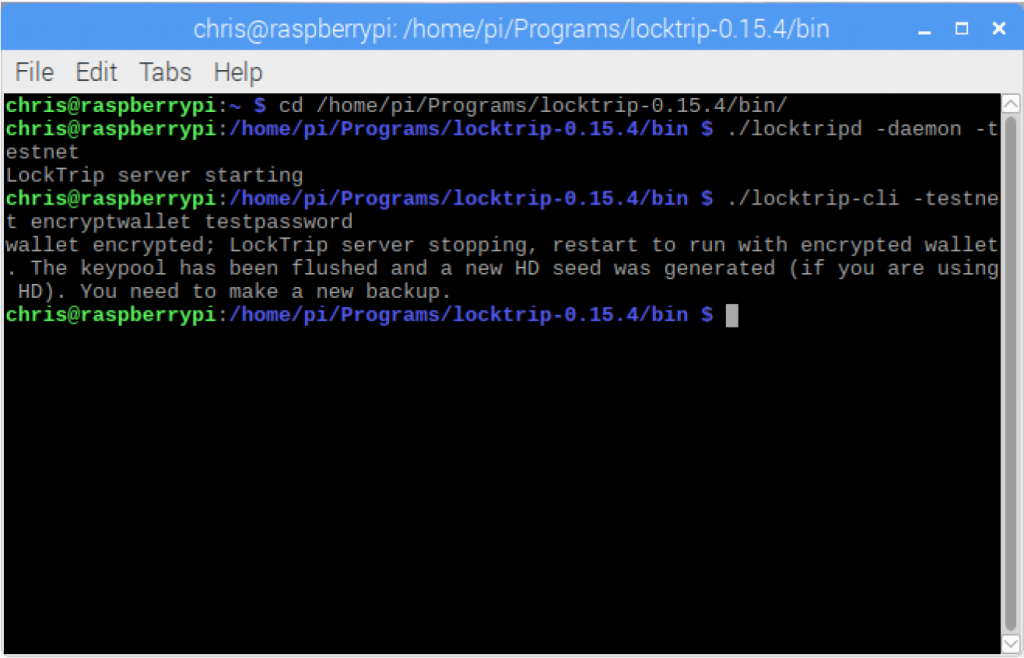
I used “testpassword” for my passphrase. You should use a strong passphrase for your wallet. Make sure you do not forget your passphrase. You won’t be able to access your coins without it.
Encrypting your wallet will stop the server. Restart it before continuing:
./locktripd -daemon -testnet
Now, when you use the getwalletinfo command, there will be an extra value listed:
“unlocked_until”: 0
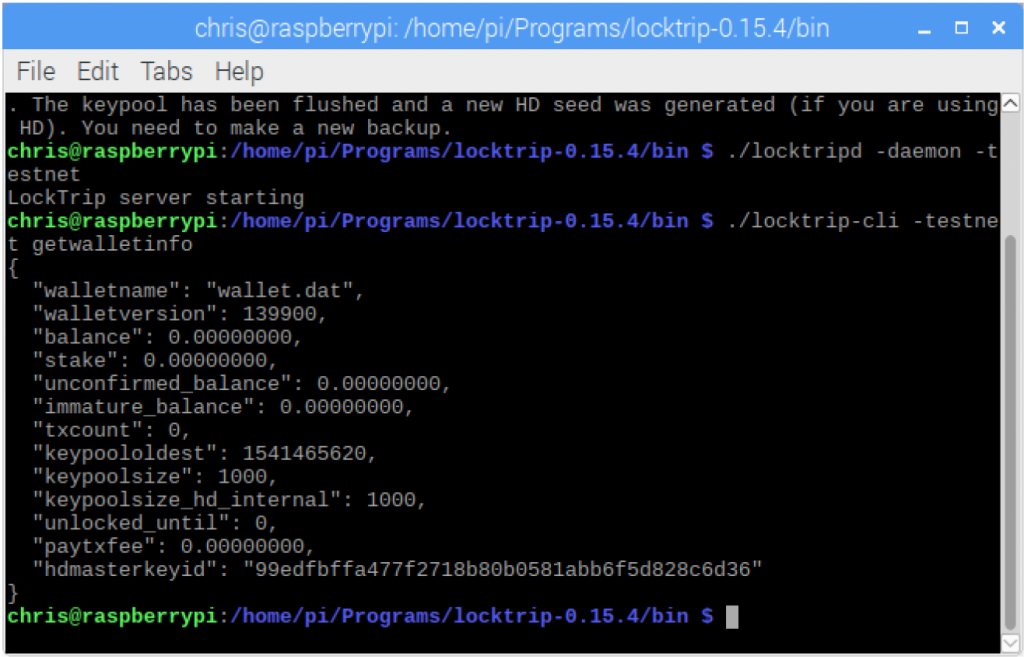
This means that your wallet is currently locked, and no funds can be sent from your wallet.
Use the following command to unlock your wallet:
./locktrip-cli -testnet walletpassphrase yourpassword 300
Here, 300 is the number of seconds you want to unlock your wallet for. It will lock automatically after the time is up. If you use the getwalletinfo command again, you’ll see a number next to “unlocked_until”. This number represents a date and time in the future.
While unlocked, you are able to send funds from your wallet and your wallet will also stake its coins. It’s possible to unlock your wallet only for staking; this will be described further below.
Step 5
Now let’s send some coins to the wallet. (Follow Step 5.1 below if you wish to use a pre-existing wallet.)
If you wish to further secure your Raspberry Pi before sending coins to it, follow Step 5.2 below. Yes, this is just the testnet, but why not learn how to do it now, in preparation for mainnet!
First, you need to get a new address. Use the following command:
./locktrip-cli -testnet getnewaddress
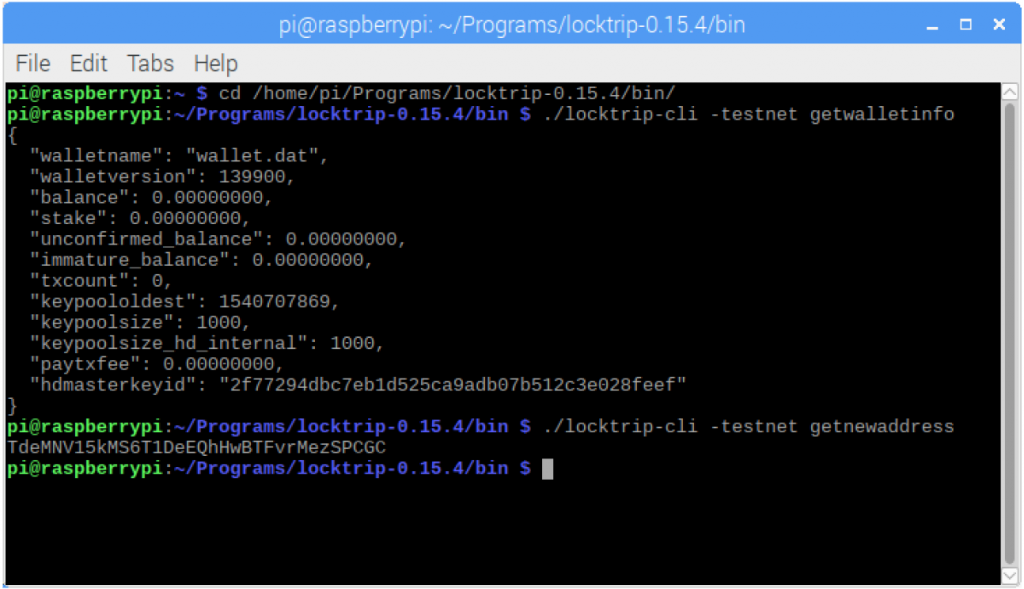
Your new address will be displayed on the next line. You can now send coins to your wallet using this address. Do not send real LOC tokens to this wallet. Load up the LockTrip testnet faucet and send some testnet coins to your new address, or send some from another testnet wallet.
Use the getwalletinfo command again to show your wallet info. (Hint: hit the up arrow on your keyboard to load previously-used commands into the Terminal window)
If your balance still displays 0, this is because your transaction has not yet been confirmed, or because your wallet is still syncing with the blockchain. You can check which block your wallet is currently synced up to by using the following command:
./locktrip-cli -testnet -getinfo
The number next to “blocks” is the block your wallet is currently synced up to. Once your wallet reaches the block containing your transaction, the amount will be accurately reflected in your wallet. All block and transaction information is available on the LockTrip Testnet Explorer. You can search for your transaction with its transaction ID or by entering your wallet address.
If you have waited a long time and the number of blocks and connections are still 0, close the wallet and copy this file to your “/home/pi/.locktrip” folder. Note the “.” before locktrip. This is the data directory, not the folder containing locktrip-qt etc.
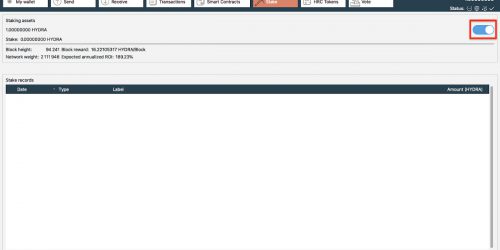
For unencrypted wallets, staking is enabled by default and will commence once your coins have been in your wallet for 1500 blocks. Again, this information can be confirmed using the testnet explorer. You can also check if your coins are staked using this command:
./locktrip-cli -testnet getstakinginfo
Your staking weight (number of LOC staked) will be shown next to the “weight” label. You will need to subtract eight zeros to get the actual number.
If you encrypted your wallet in Step 4, you can unlock your wallet only for staking using the following command:
./locktrip-cli -testnet walletpassphrase yourpassword 999999999 true
You can enter any number of seconds; 999999999 seconds equates to almost 32 years. Please note: when you start the daemon, your wallet will be locked by default. You must unlock your wallet for staking each time you start the daemon.
After entering your wallet passphrase into the terminal, it will be stored in the command line history (accessible by pressing the keyboard up-arrow). If somebody were to access your Pi somehow, they could see your passphrase. To be extra safe, you can delete the command history using the following command:
history -c
Step 6
To send coins to another wallet, use the command below. (If you encrypted your wallet, you will have to unlock it first.)
./locktrip-cli -testnet sendtoaddress address amount
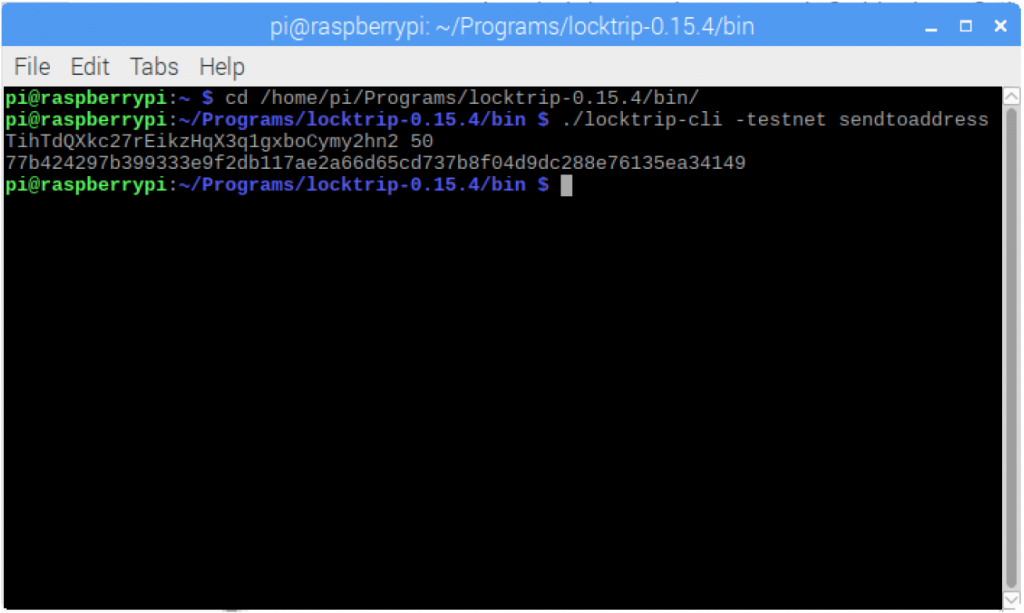
Once sent, a transaction ID will be shown below your command. You can copy and paste this into the LockTrip Testnet Explorer to see the transaction information.
That’s all for this setup guide! There’s many more commands available for your wallet. You can see the full list by using the following command:
./locktrip-cli -testnet help
I’ve also put some extra instructions below, regarding keeping your Pi up-to-date, etc. This is recommended for security.
Again, feel free to ask any questions in the comments section below!
Enjoy, and thank you for supporting LockTrip!
(Step 5.1) Using a pre-existing wallet
First, stop the daemon using the following command:
./locktrip-cli -testnet stop
Now, replace the wallet.dat file found in the “/home/pi/.locktrip/testnet4/” folder with your pre-existing wallet. Start the daemon again. Initially the balance will show 0. You need to wait for the wallet to rescan.
(Step 5.2) Further securing your Raspberry Pi
One of the easiest ways to add extra security to your Raspberry Pi is by locking it down using Uncomplicated Firewall (UFW). Enter the following command to install it:
sudo apt install ufw
You can start and stop the firewall using the following commands:
sudo ufw enable
sudo ufw disable
Now, enter the following command to deny all incoming requests:
sudo ufw default deny incoming
The LockTrip testnet wallet uses tcp port 1335 for incoming connections, so we need to allow this port:
sudo ufw allow 1335/tcp
Your firewall setup is now complete!
You can check your firewall status and its rules using this command:
sudo ufw status
If you had the firewall set up for the previous wallet ports (1337), you can now delete the rule for TCP port 1337 that we created:
sudo ufw delete allow 1337/tcp
Keeping your Pi up-to-date
It’s also wise to keep your Pi up-to-date. This will make sure it has the latest security fixes, etc. Simply run these commands:
sudo apt-get update
This will update your system’s package list.
sudo apt-get dist-upgrade
And this one will upgrade all your installed packages to their latest versions. Your kernel and firmware will also be updated via these commands. It’s possible to schedule these commands to run regularly; you can find plenty of guides online if you wish to do this!
There’s a number of other ways to increase the security on your Raspberry Pi. You can find a detailed guide on the Raspberry Pi website, here. And here’s another good article on basic Pi security.
Back-up your Pi
You can create an image of your entire SD card easily using freely available tools. This not only backs up your wallet, but also all of the work you have done on your Pi up to now (firewall settings, etc.). Mac users can use the Disk Utility application included in MacOS. Windows users can utilize Win32 Disk Imager. Both of these applications allow you to restore the image to an SD card. Here’s a nice guide with all the details you need!


Thank you for your tutorial. Everything went well, I have completed all the steps. However, after some time when I want to input any testnet-related command I get the following error:
error: couldn’t connect to server: unknown (code -1)
(make sure server is running and you are connecting to the correct RPC port)
Please assist. Thank you!
Thanks for your comment and for using my guide! There is a bug related to encrypted wallets in the current testnet release. When the wallet is encrypted, the wallet application stops unexpectedly. If you delete your wallet.dat file, a new unencrypted one will be created. Please use this unencrypted wallet until the testnet release is updated. I have updated the guide to reflect this. Thank you for reminding me! 🙂
Thank you. It works now. Please let me know when the update of the testnet release will be released. Also, how to check whether the coins have been in the wallet for more than 1500 blocks? Because the stake value is currently still 0.
Hi! The testnet wallet has been updated (to version 0.16.1). I have updated the guide to reflect this. The answer to your question can be found in Step 5 (use the “getstakinginfo” command) 🙂
it doesnt get the command at step 2
Hi! Which command are you having trouble with? Make sure you type it in exactly as shown. Or you can copy/paste into the terminal window (open this guide on your Pi in the Chromium browser) 🙂
Hello,
I use 0.16.1, pi 3 B+, 32Gb sd
The daemon stops always after reaching end of blocks (close to 60000), unexpectedly.
Then I have to restart it, and then sill fails…
Any clue ?
Thanks, Nico
Hi Nico! Thanks for your question.
Please try the following, in this order. Let the wallet run to see if it crashes after each step. If it crashes, move onto the next step.
1. Stop sending transactions, if you are.
2. Back up your wallet.dat somewhere, if you need it. Delete the entire ./locktrip directory. Restart the wallet and wait.
3. If you have set up port forwarding, disable incoming connections by starting the wallet using this command: ./locktripd -daemon -testnet -listen=0
4. Increase the size of the Pi swapfile by following this guide: https://www.bitpi.co/2015/02/11/how-to-change-raspberry-pis-swapfile-size-on-rasbian/
This should help!
Hi and Thank you,
#4. did the trick ! swap needed about 220Mb, initially set to 100Mb, I set it to 1Gb
I succeded to generate new address and send some faucet, but I am not able to retreive my address by any combination found in the locktrip-cli -testnet help
Always saying incorrect address…
Is there a kind of wiki or further help for the commands ?
Thanks again
Hi again Nico! 😀
You can use the listaddressgroupings command. The address will only appear once it has received coins.
That’s working perfectly ! Thanks for the support
Many thanks James,
this also resolved my issue with a crashing Pi …
You’re welcome Lukas! I’m glad to hear that 😀